As all of us study from a younger age, the solar is the star on the middle of our photo voltaic system. Nevertheless, in contrast with the celebs seen to Earth at evening, our native star is comparatively under-photographed. Though the setting or rising solar is a standard goal in pictures, all of those photos present the solar as a homogenous, overexposed ball of sunshine. It’s because, even with the bottom ISO and publicity instances, the solar’s floor is just too vibrant to resolve with normal pictures gear. However with the proper tools, the world of photo voltaic pictures unveils the true dynamic nature of our native star.
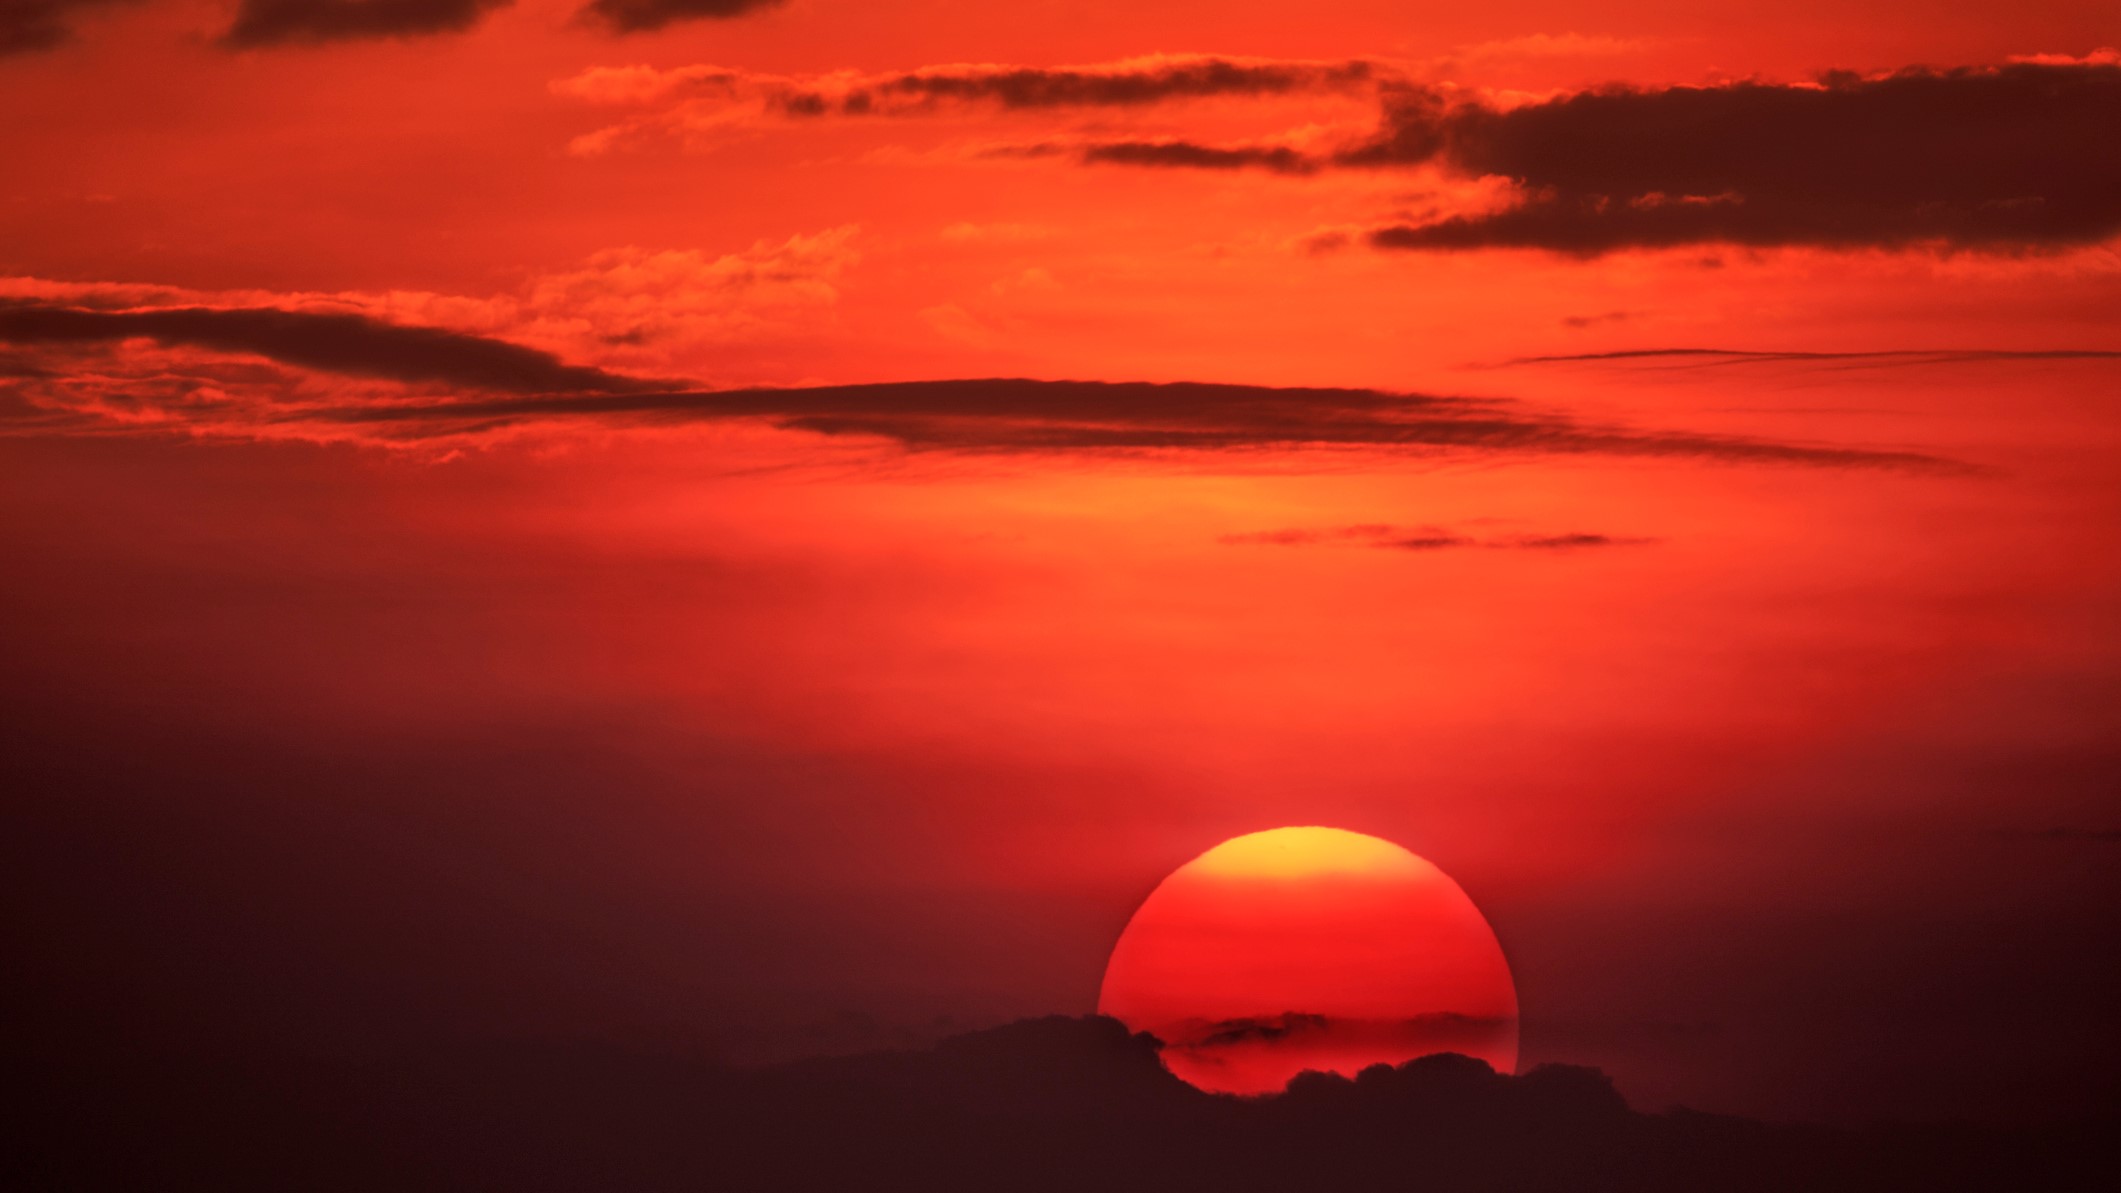
Though we might not see it with our eyes or within the pictures we seize with our normal cameras or telephones, the sun is consistently altering. Constructions on the floor or decrease atmosphere of the sun can fluctuate from each day, and even from hour to hour. On this information, we’ll define what you may want to securely {photograph} our ever-changing solar and what buildings you possibly can hope to picture.
Security: Take precautions
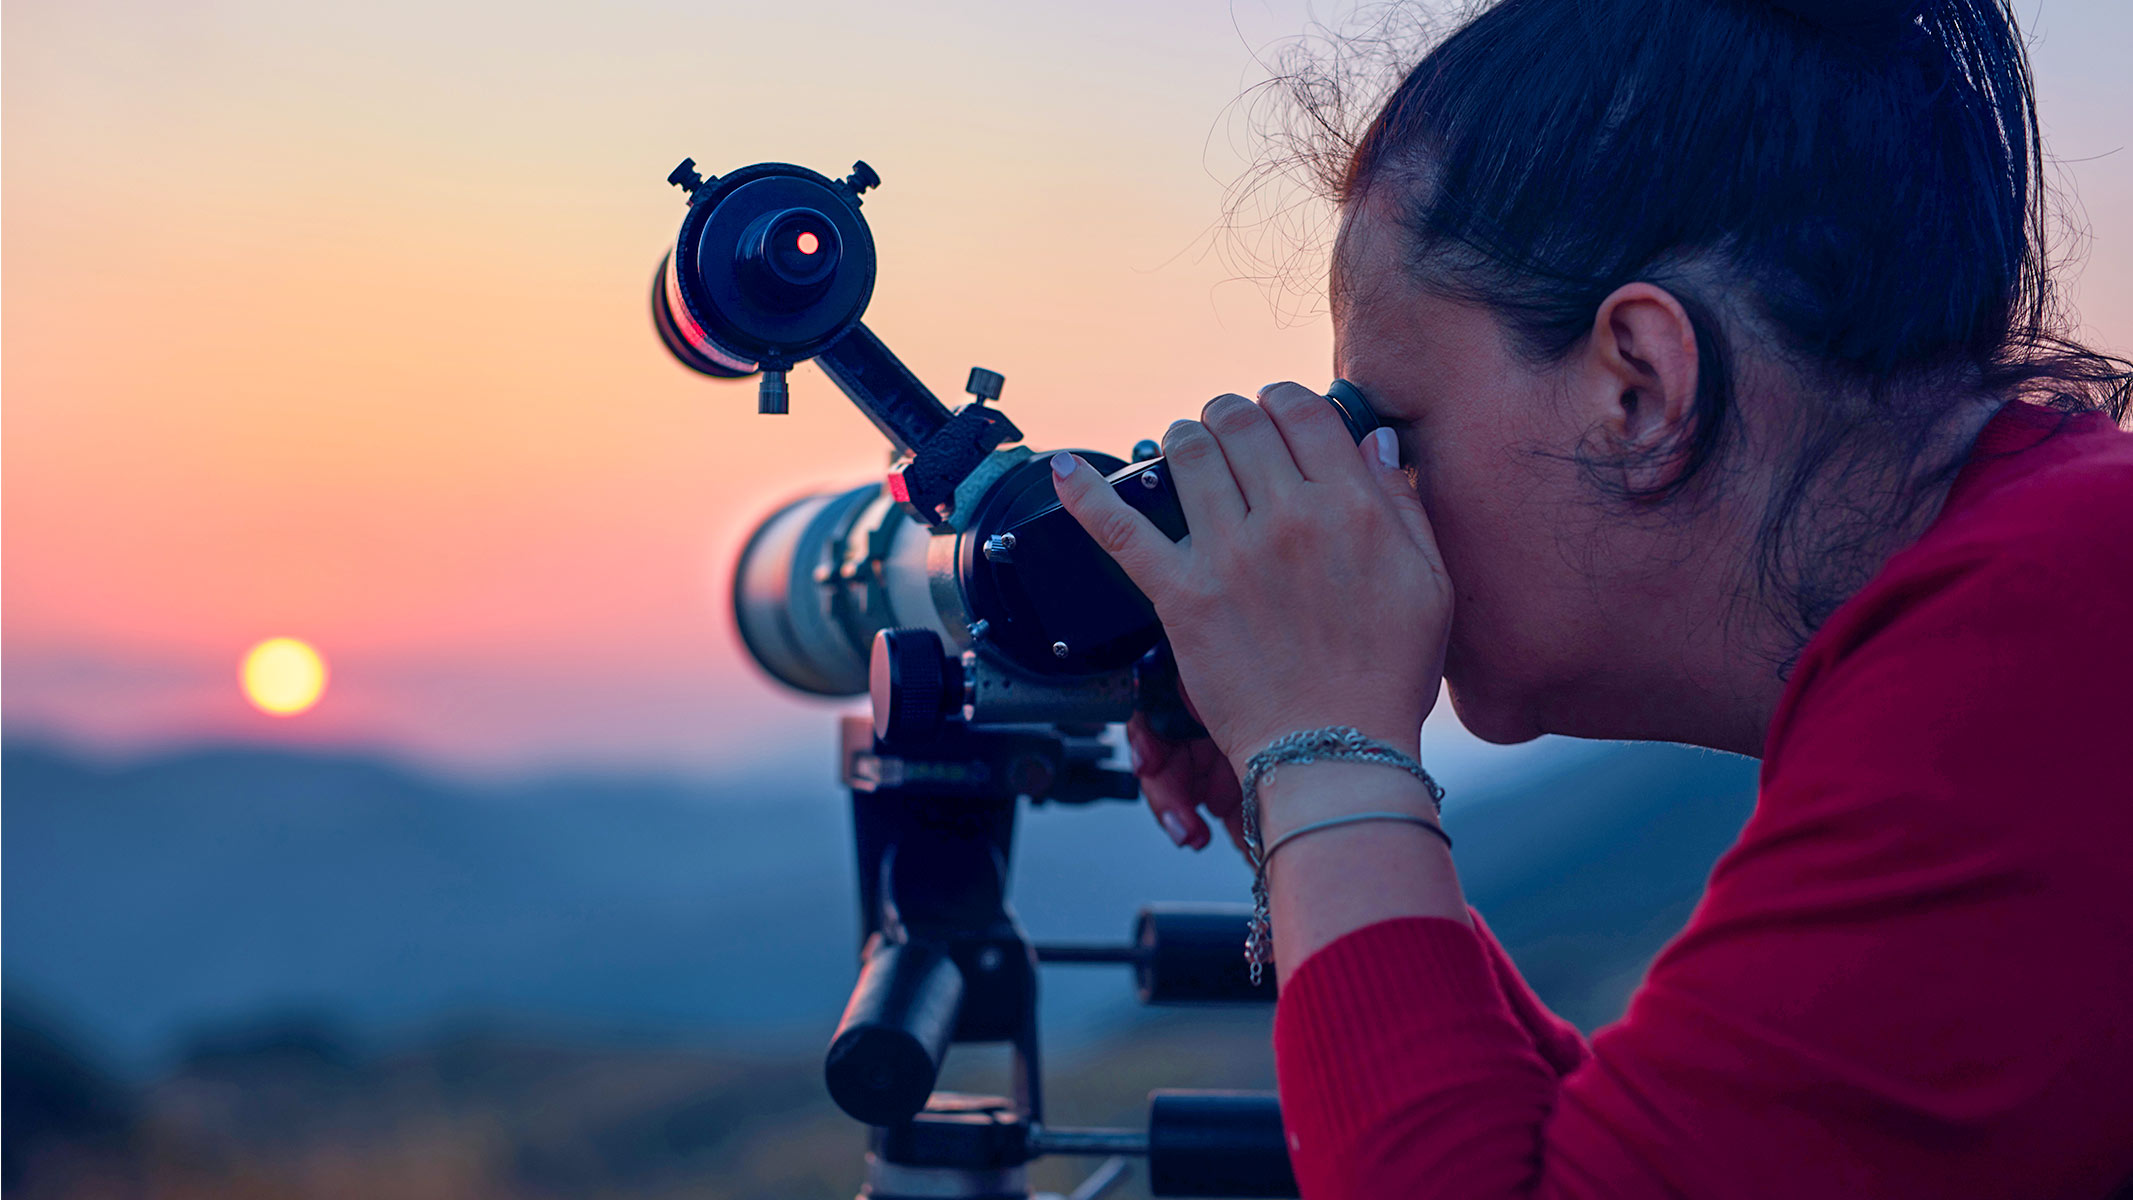
It can be crucial to not look straight on the solar. Doing so for even brief durations can completely harm your eyes. If you wish to lookup on the solar for reference, use a pair of certified solar eclipse glasses. Try among the best solar viewing gear, however notice that some merchandise let you {photograph} the solar safely by means of a digicam or a telescope, however will not be rated for direct remark along with your eyes. See our information on how to observe the sun safely.
Cameras, lenses and settings
Finest Impartial density filter
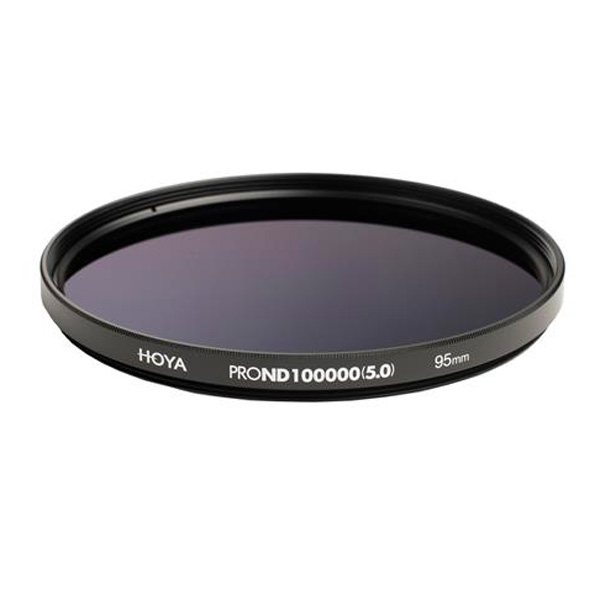
The Hoya Pro ND 100000 Solar Filter is particularly designed for photo voltaic pictures with mirrorless cameras and telescopes. It shouldn’t be used to look straight on the solar as a result of it doesn’t block dangerous rays. It reduces the sunshine by 16.5 stops and supplies impartial colours and sharp pictures of the solar.
Regardless of the way you alter the settings, even on the best cameras for astrophotography, the solar will stay too vibrant so that you can efficiently picture any element in the event you do not use the best tools. Due to this fact, to {photograph} the solar, you could considerably cut back its efficient brightness.
You are able to do this with a neutral-density filter, which attaches to the top of your digicam lens. Impartial-density filters are utilized in every kind of pictures, however many won’t have the ability to dam out sufficient daylight to picture the solar. Due to this fact, you must search for a neutral-density filter designed particularly for photo voltaic pictures.
With this filter connected to your digicam, it is possible for you to to efficiently {photograph} the solar in optical gentle. Completely different filters may change the obvious shade of the solar in your picture, with grey/white and orange/yellow being widespread filter choices.
It is essential to notice that though a purpose-made filter can cut back the solar’s brightness sufficient to picture the star, it isn’t sufficient to guard your eyes from daylight. Due to this fact, whereas utilizing a neutral-density filter for photo voltaic pictures, don’t look into the optical viewfinder in your digicam (when you’ve got one). As an alternative, use the digital show. Equally, don’t use the filter to look straight on the solar.
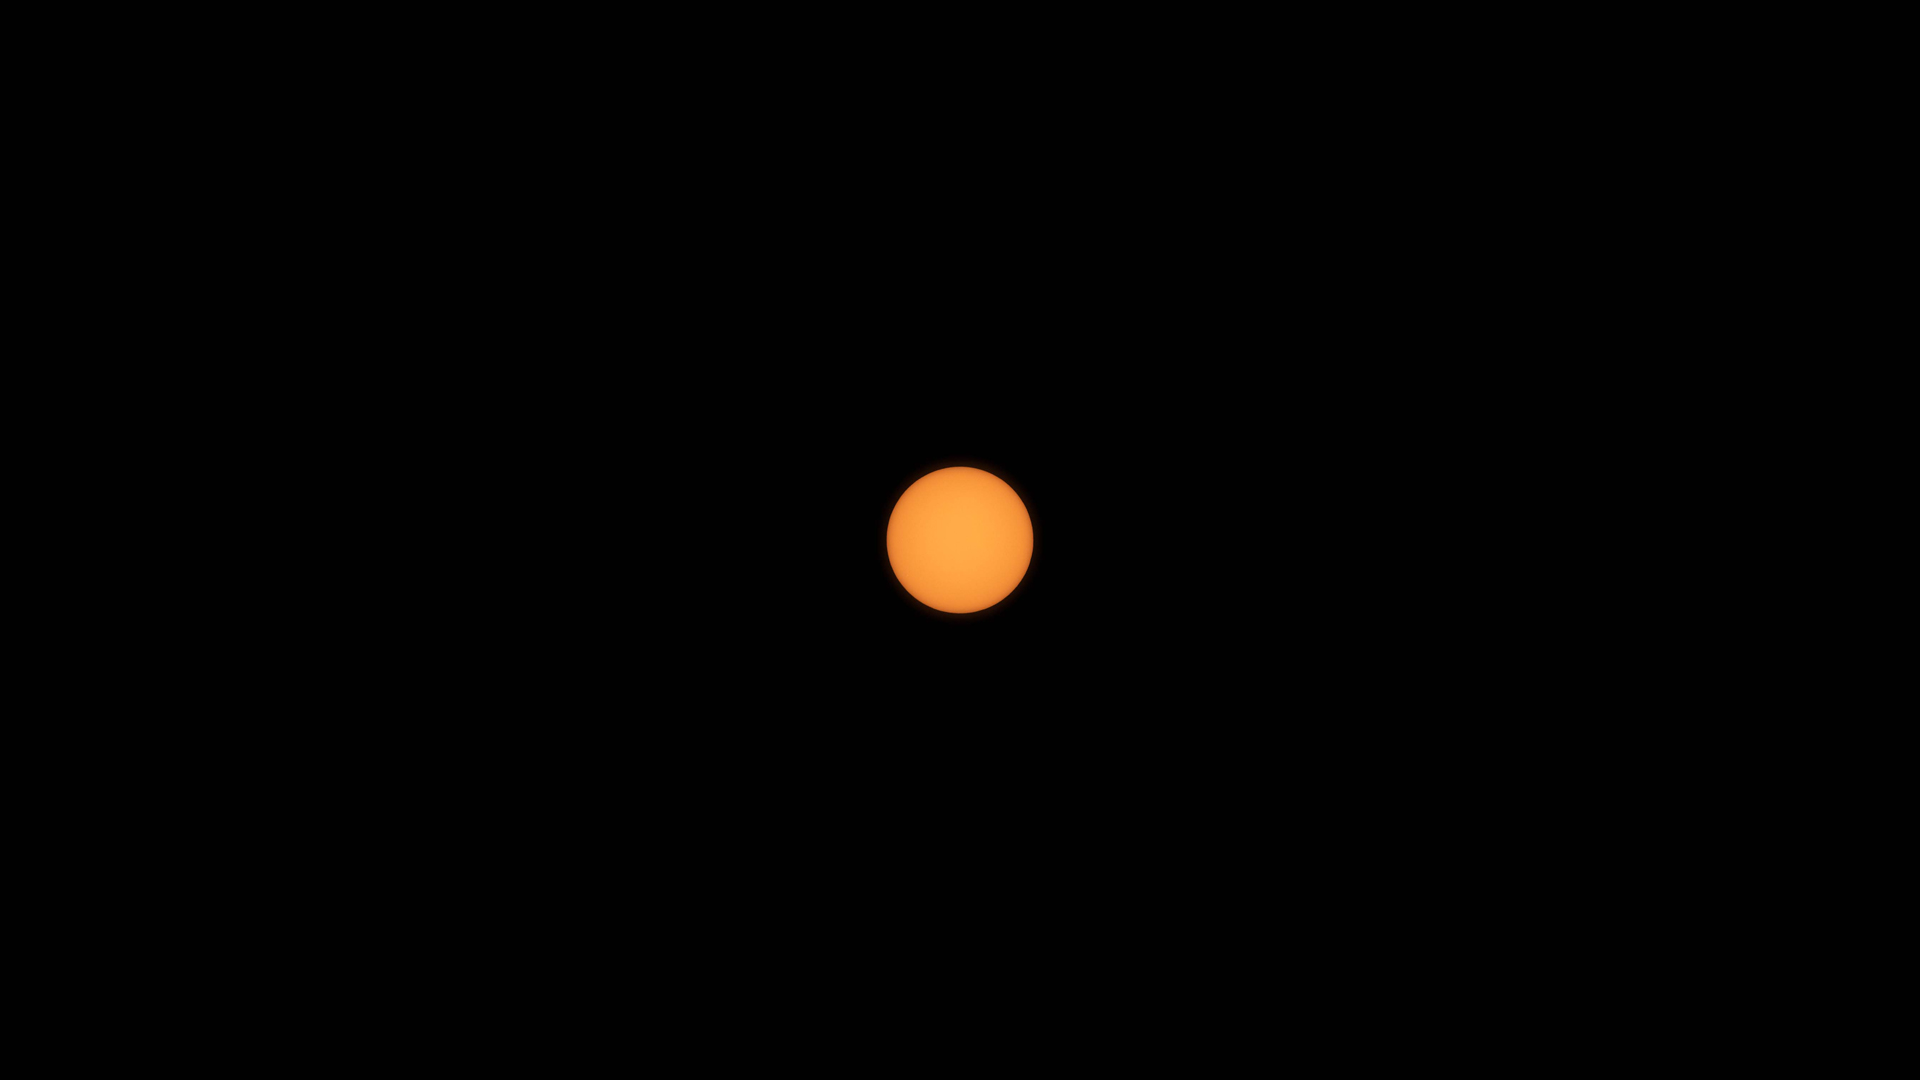
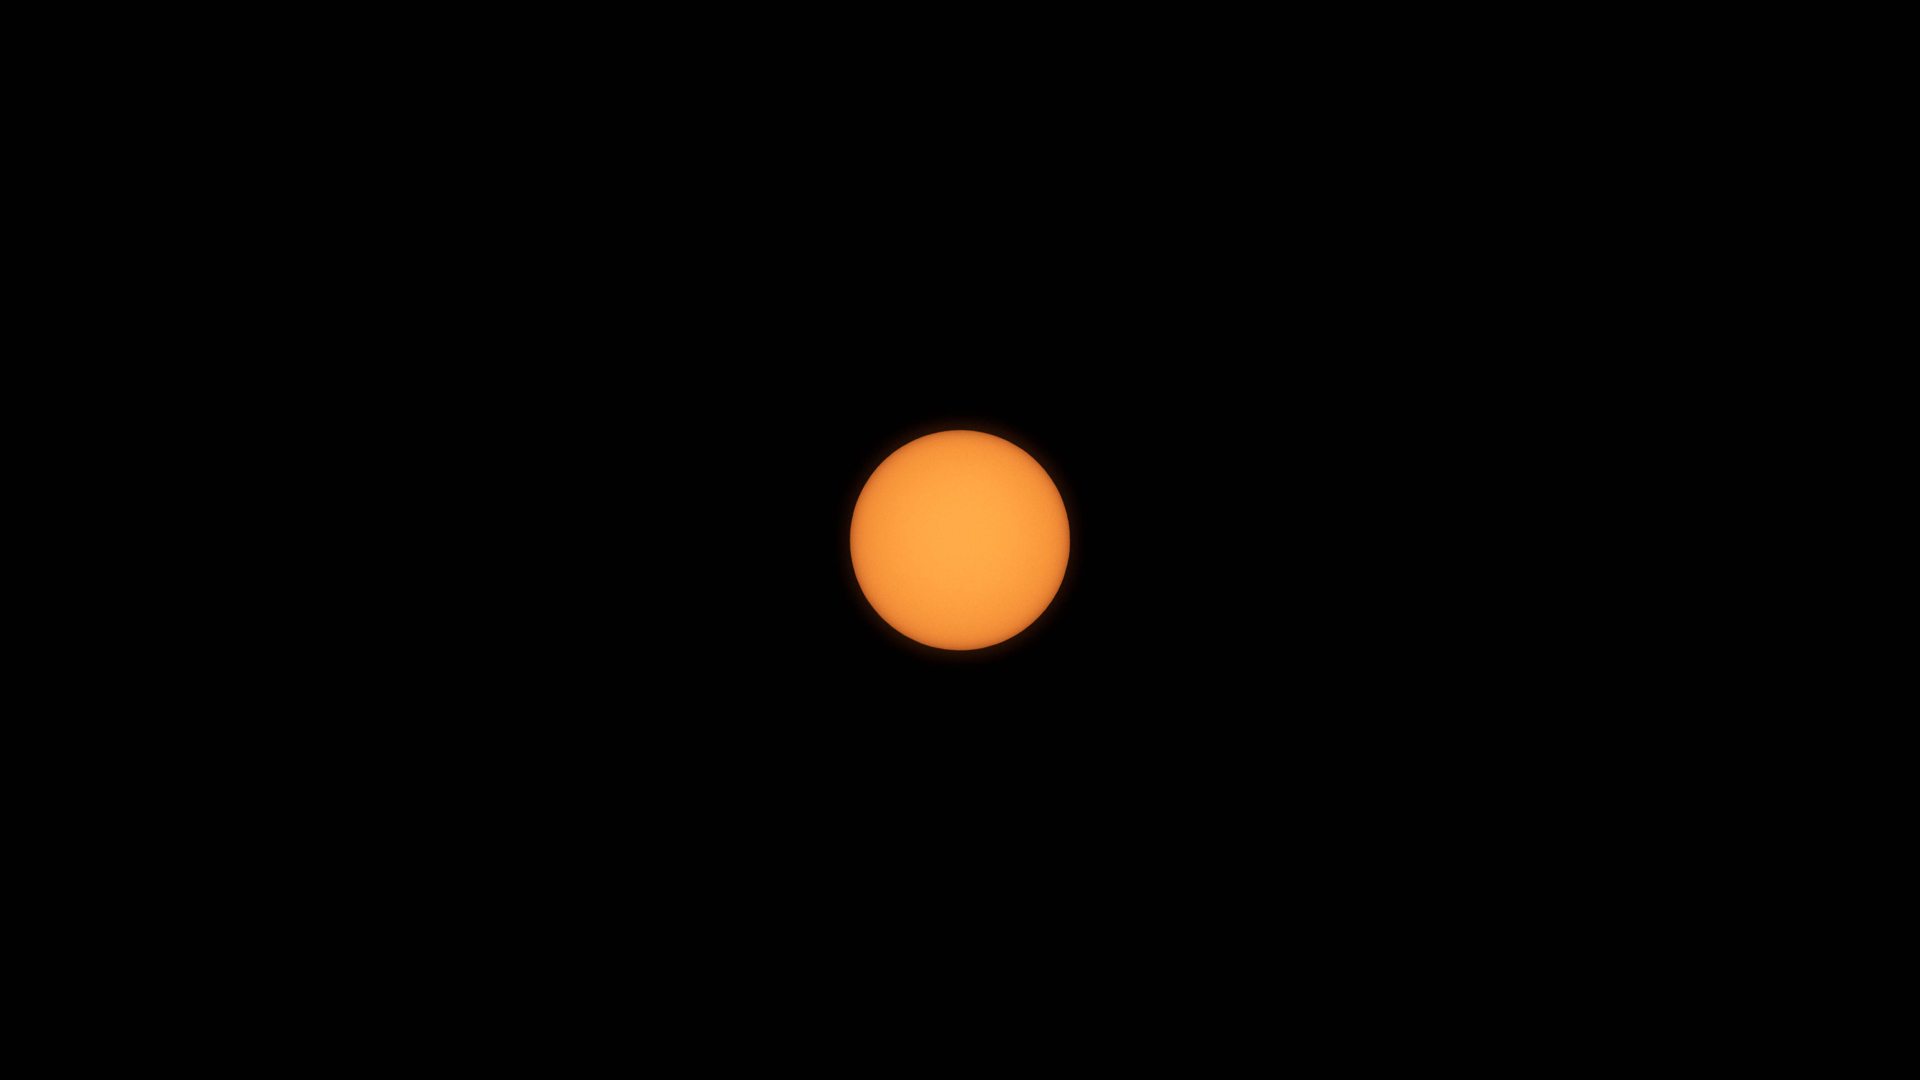
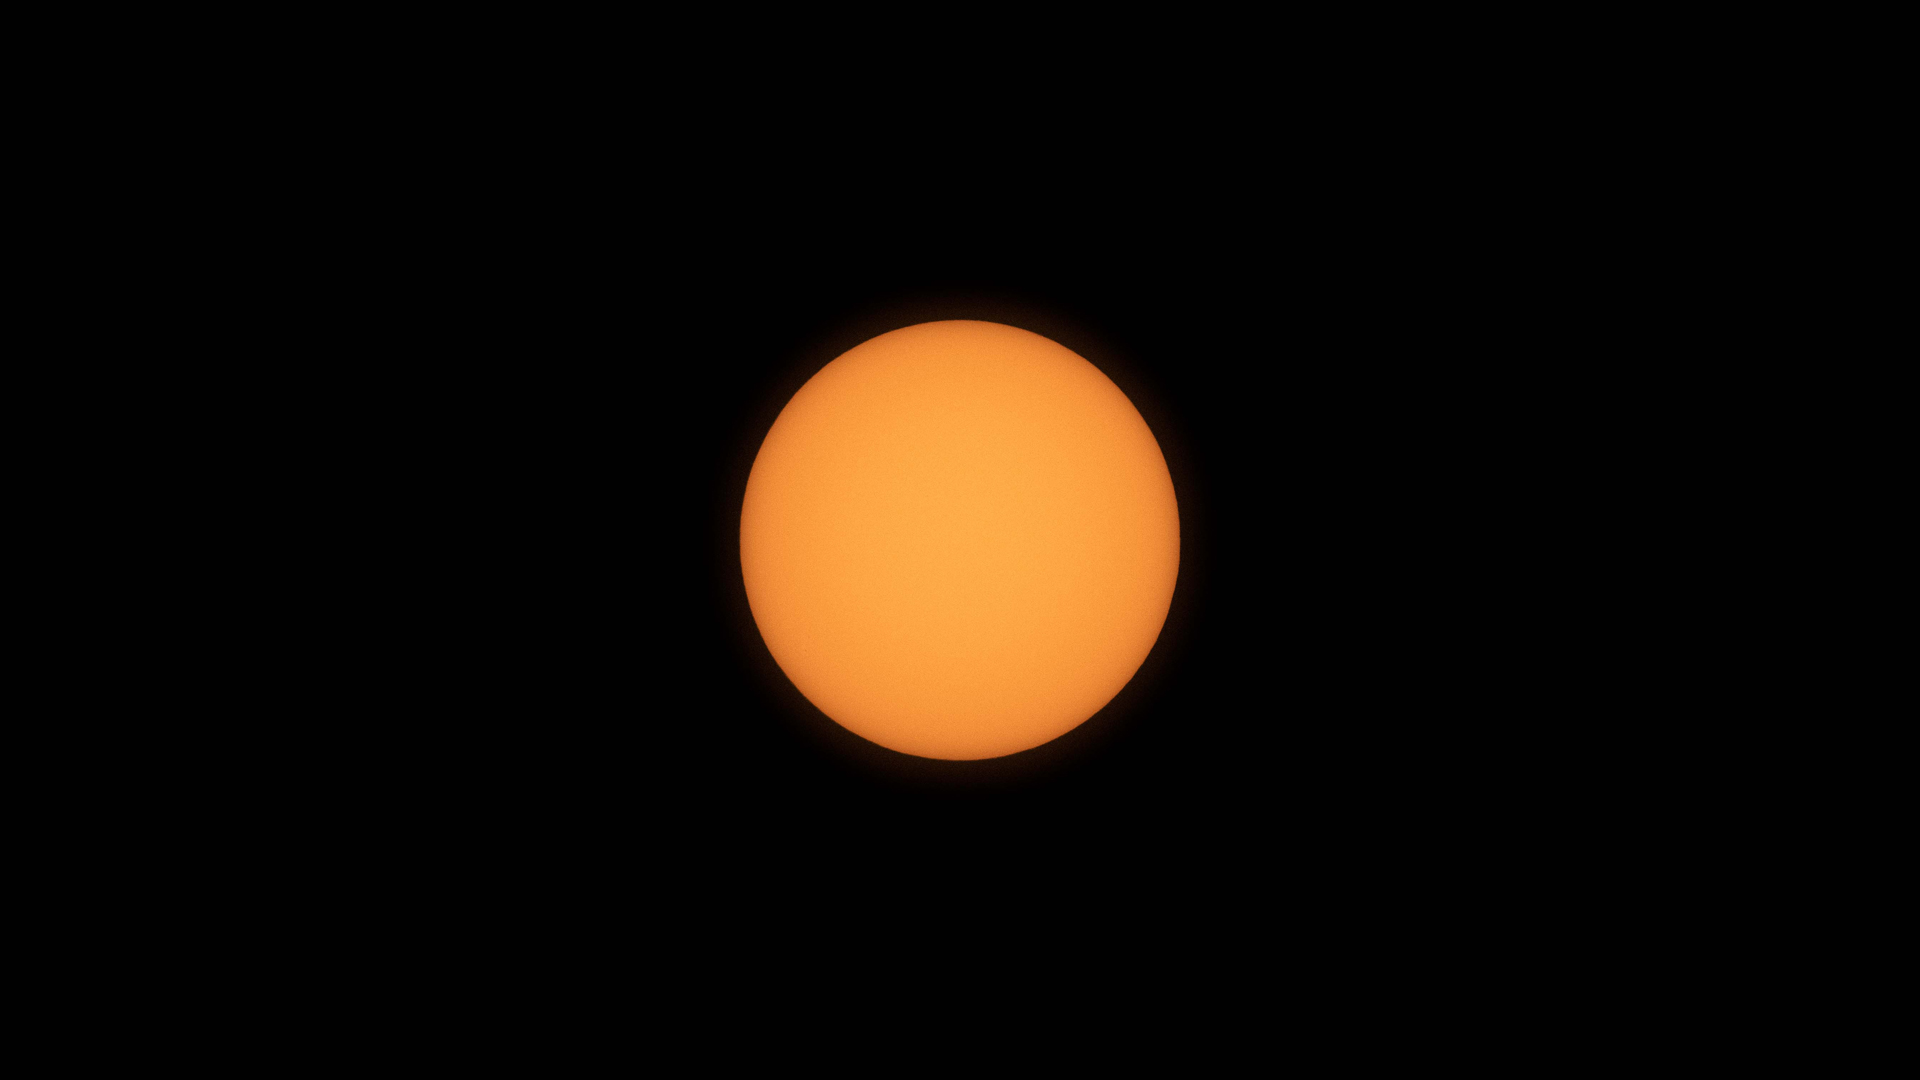
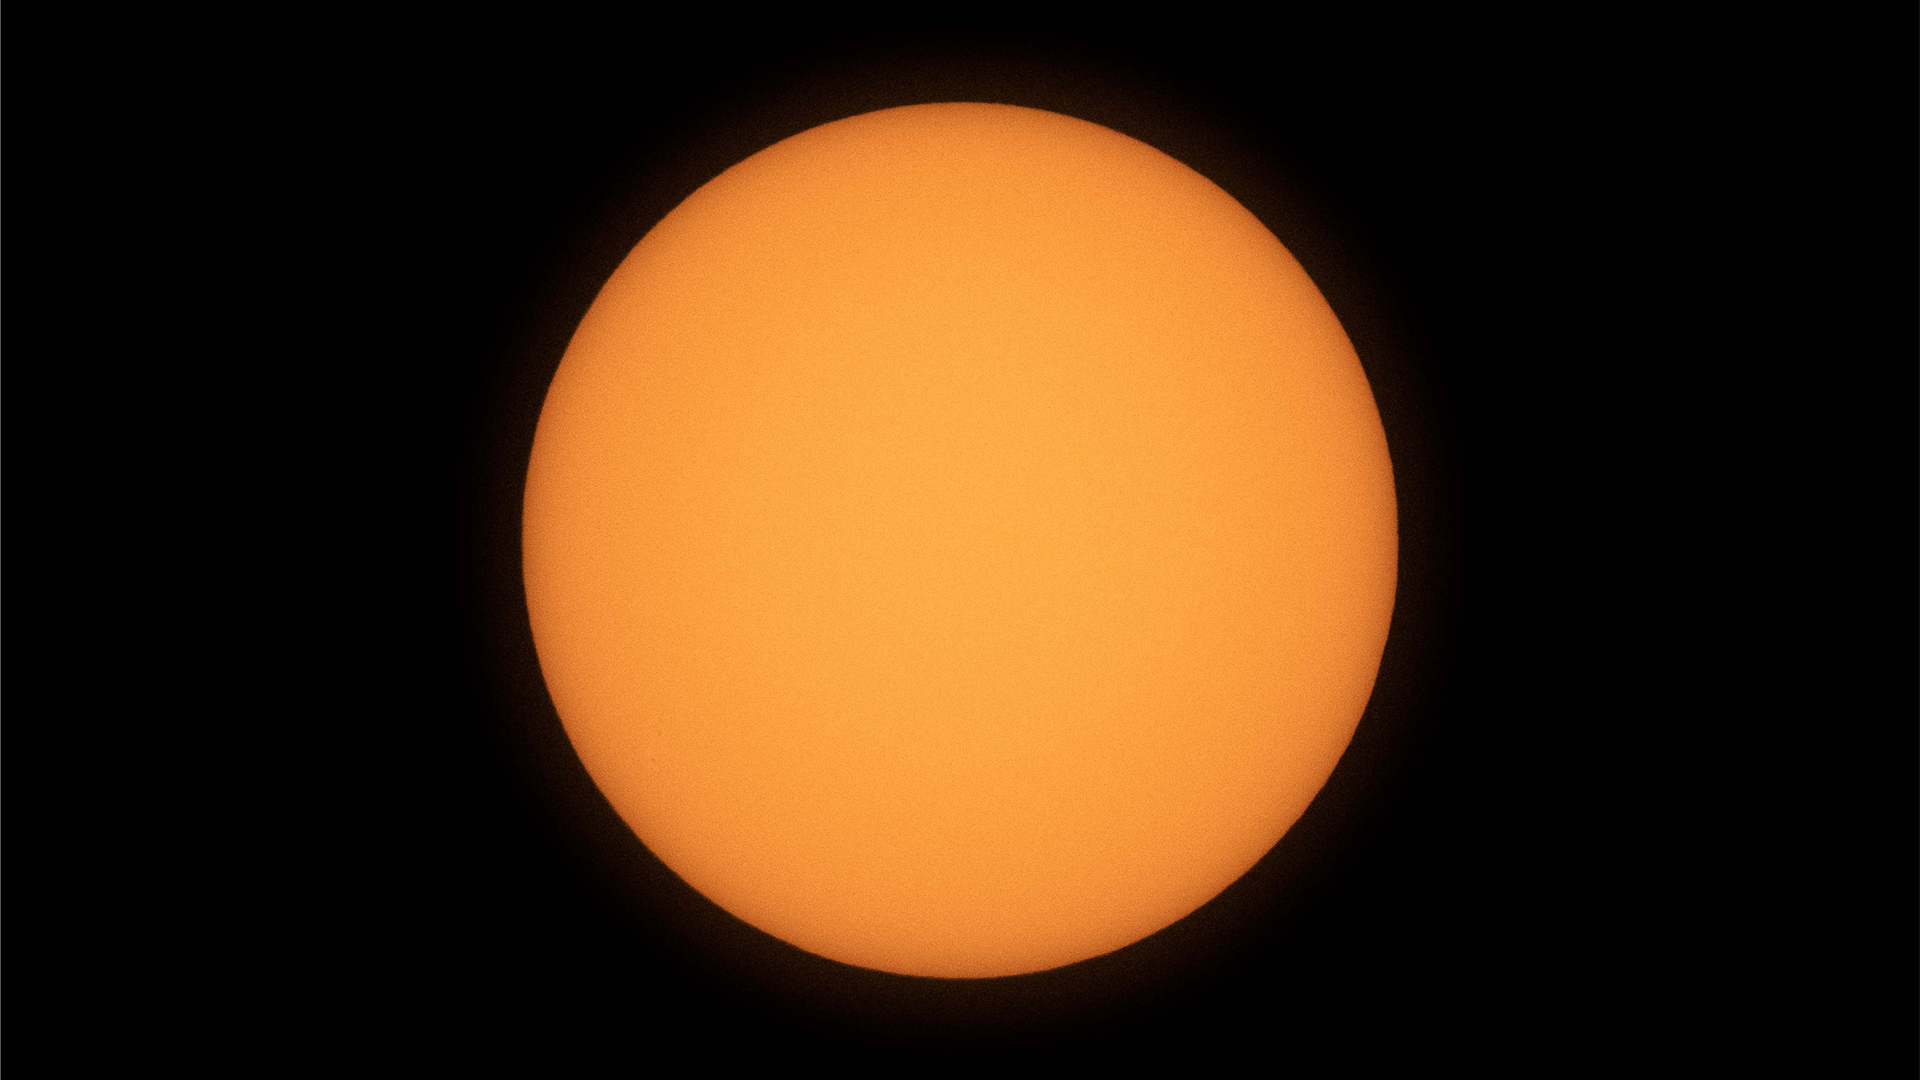
The scale of the solar in your picture will rely upon the focal size of your digicam lens. At a minimal, you may want a 200-millimeter telephoto lens. Nevertheless, as proven within the photos under, this can go away a number of empty house in your digicam body. The longer the focal size, the bigger the solar will seem in your picture, and thus the upper the decision of the solar shall be. The pictures under present how the solar appears to be like in a choice of focal lengths on the Nikon D850, a full-frame DSLR digicam.
Picture 1 of 4
As soon as your lens and filter are sorted, you possibly can mess around along with your digicam settings.
1. Set your digicam to aperture-priority mode. Sometimes, an aperture between f/5.6 and f/8 will give the perfect efficiency for many lenses, however you possibly can mess around with it to see what works finest in your setup.
2. Regulate your publicity time. The publicity time you set might rely upon a number of components. When you don’t have a tripod or you might be utilizing a tripod in robust wind, you’ll want to shorten your publicity time. It will cut back the overall wobble all through the publicity and result in a sharper picture. If in case you have a robust tripod and wind isn’t a difficulty, you possibly can afford to extend the publicity time, which is able to lower the noise ranges.
3. Set your ISO. You don’t want an ISO sensitivity excessive sufficient to saturate the picture, however you want it excessive sufficient to keep away from including noise. An extended publicity time will enable for a shorter ISO, with out introducing an excessive amount of noise. Mess around with these settings to discover a mixture that works for you. As with nighttime astronomy, one other good tip is to not take the {photograph} instantly by clicking the seize button (in the event you’re utilizing a tripod), as your interplay with the digicam will trigger the system to wobble. As an alternative, set a timer for 10 seconds or longer, or use a distant management to take the shot.
Photographing the solar with telescopes
In case you are feeling extra formidable, you possibly can {photograph} the solar with one of many best telescopes. We cannot dive a lot into the digicam setup right here, as it is going to be just like that utilized in nighttime astronomy. You possibly can both mount your ordinary digicam to the telescope straight or use a purpose-made eyepiece digicam. Both approach, the essential items of apparatus usually sit on the different finish of the telescope that is pointing on the solar.
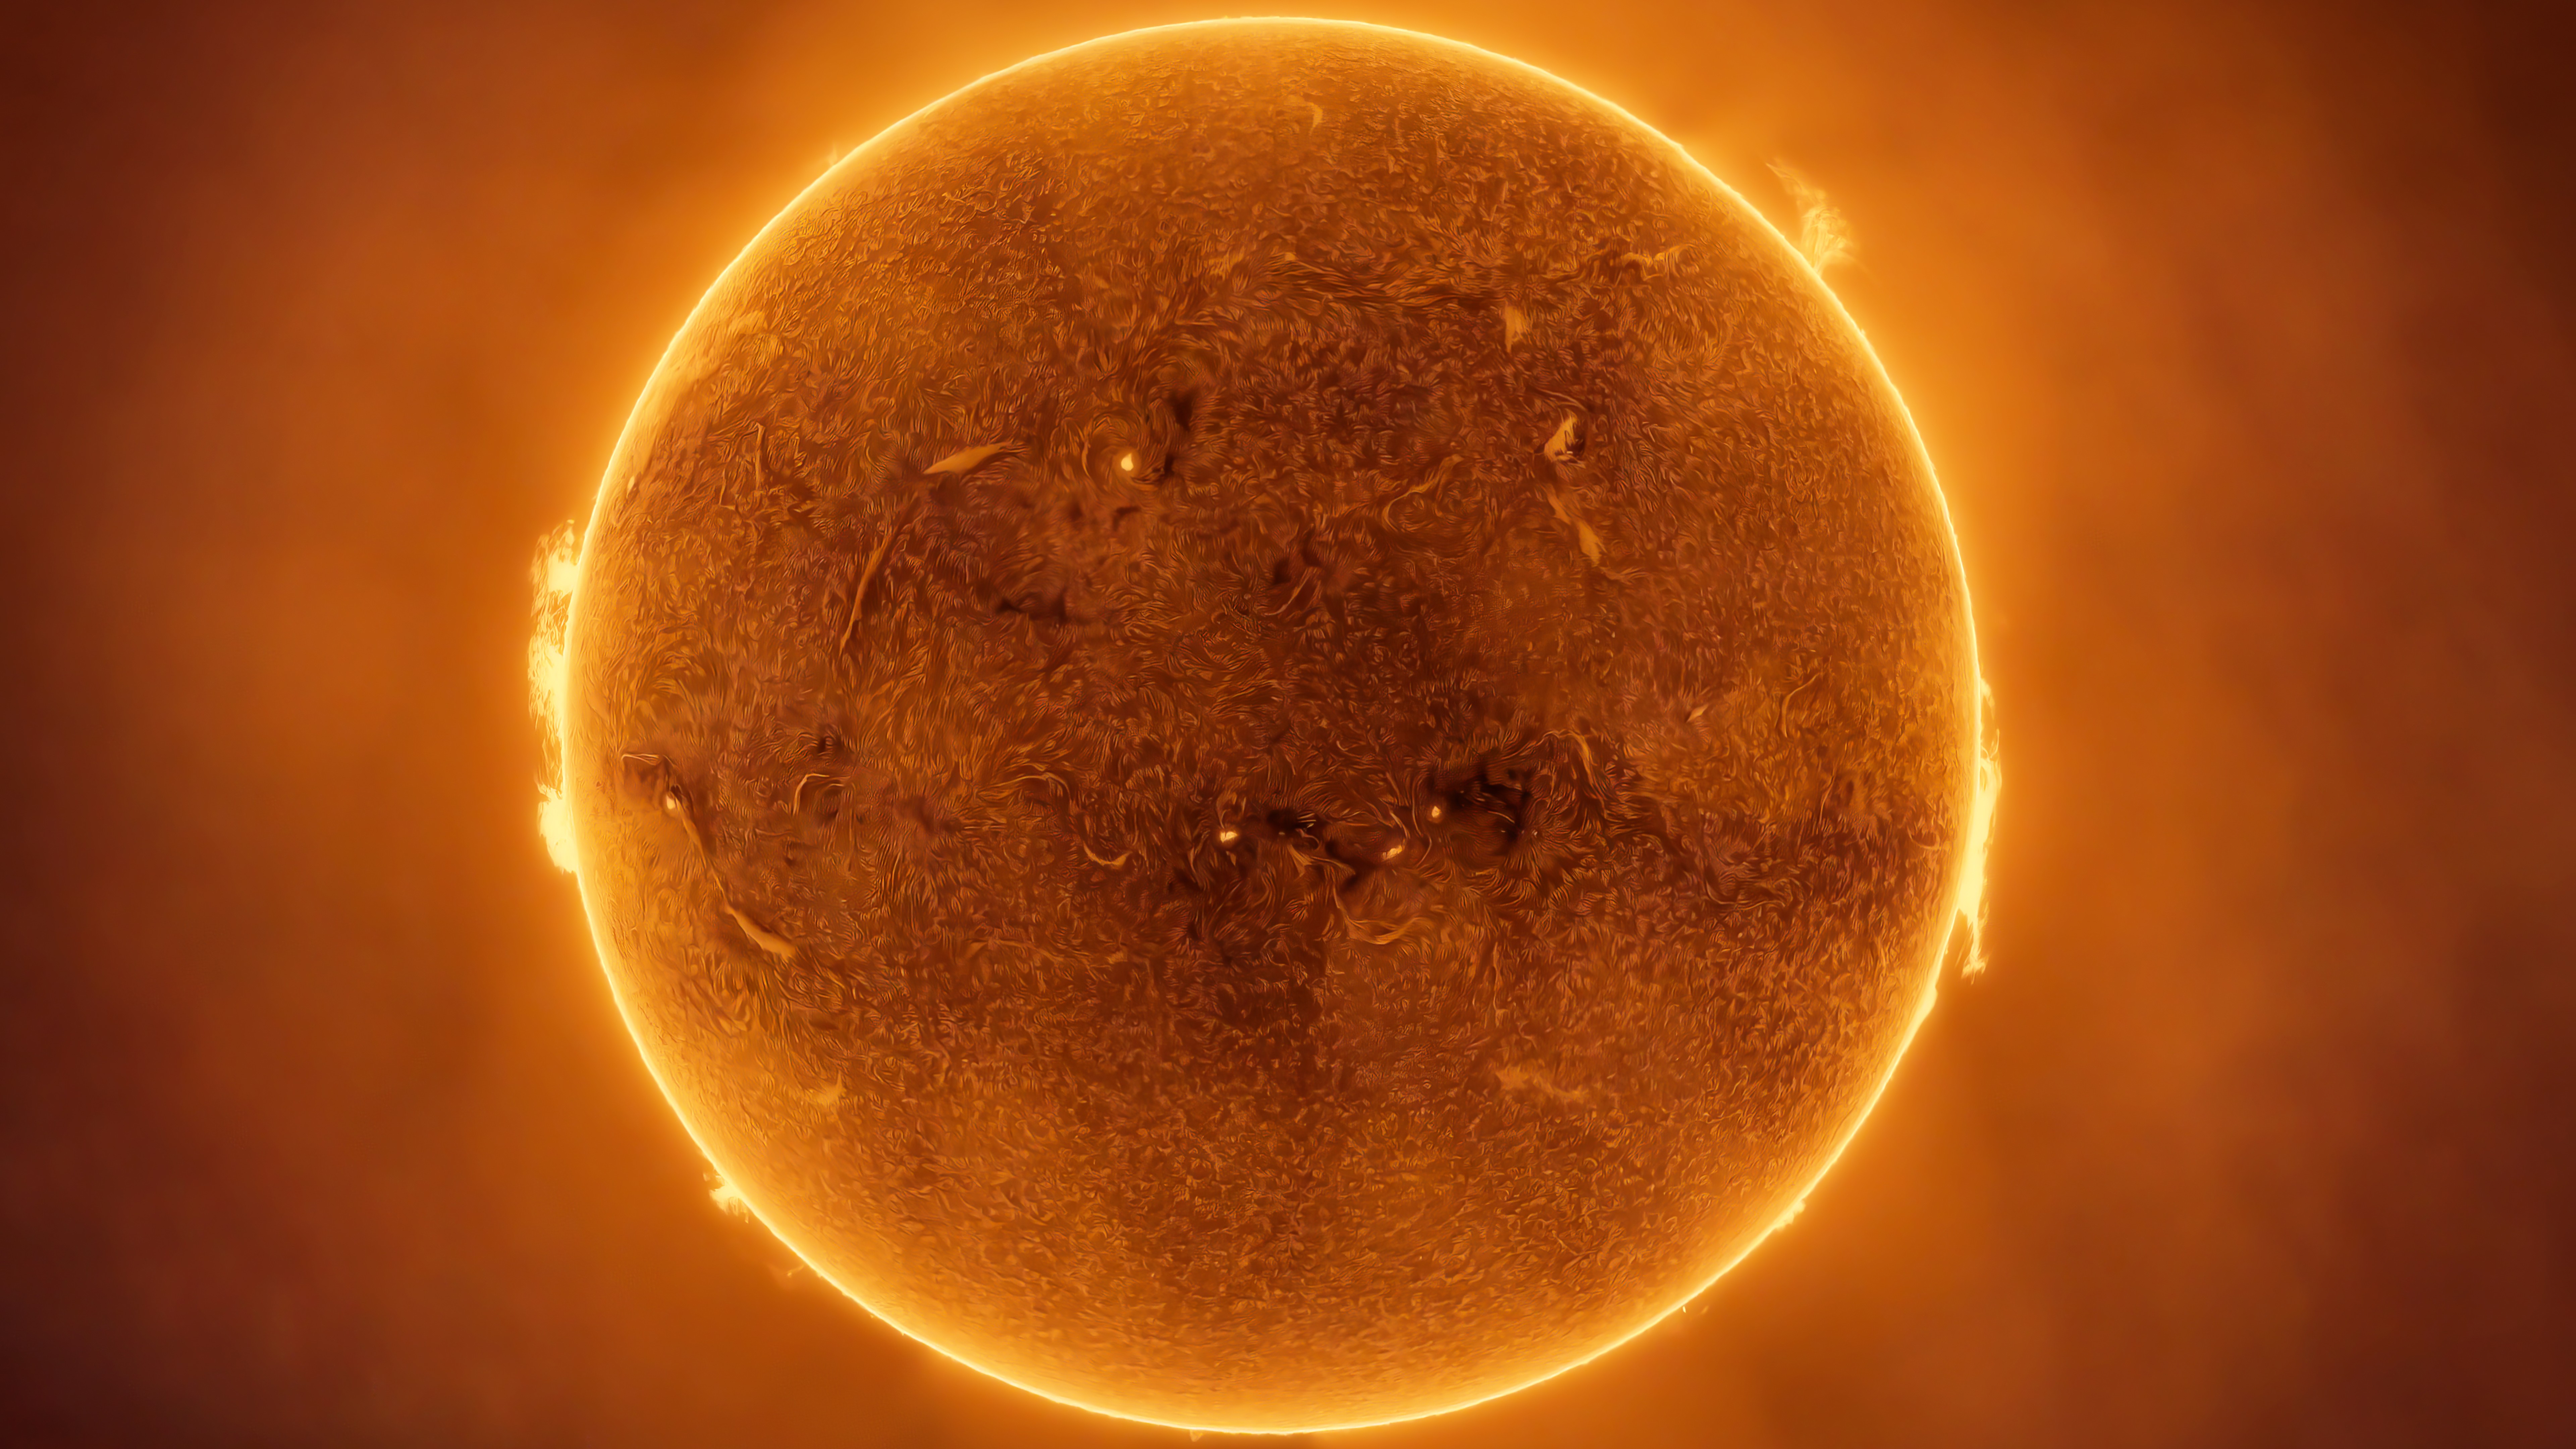
Completely different filters enable us to see completely different layers of the solar, so let’s shortly recap these layers of our native star. The floor of the solar known as the photosphere. That is the layer of the solar that emits the daylight seen to the human eye. Above the photosphere, which has a temperature of round 10,000 levels Fahrenheit (5,500 levels Celsius), is a layer known as the chromosphere. The chromosphere is cooler and fewer dense than the photosphere, with a temperature round 7,200 F (4,000 C). Above the chromosphere, temperatures quickly improve by means of a skinny transition area, earlier than reaching the photo voltaic corona. The corona is the tenuous outer environment of the solar, with temperatures of round 1.8 million F (1 million C), which turns into seen to us throughout a complete solar eclipse.
Identical to in your digicam, you possibly can connect a purpose-made photo voltaic filter to the top of your telescope. Alternatively, you need to use a devoted photo voltaic telescope, which makes use of a system of inside filters. Filters block nearly all of daylight, permitting solely a small quantity of sunshine into your telescope. Completely different filters enable in gentle from completely different layers of the solar, thus altering the options of curiosity out there to your pictures. The three main filter varieties are white gentle, H-alpha and Ca Okay.
Celestron EclipSmart Filter
Celestron EclipSmart Solar Eclipse Filter
This can be a easy and fast choice for getting your digicam or telescope able to level on the solar. You need to at all times examine your filter earlier than use and by no means use this with an optical viewfinder on a DSLR, it might completely harm your eyes, be sure that to make use of reside view on the display screen as a substitute.
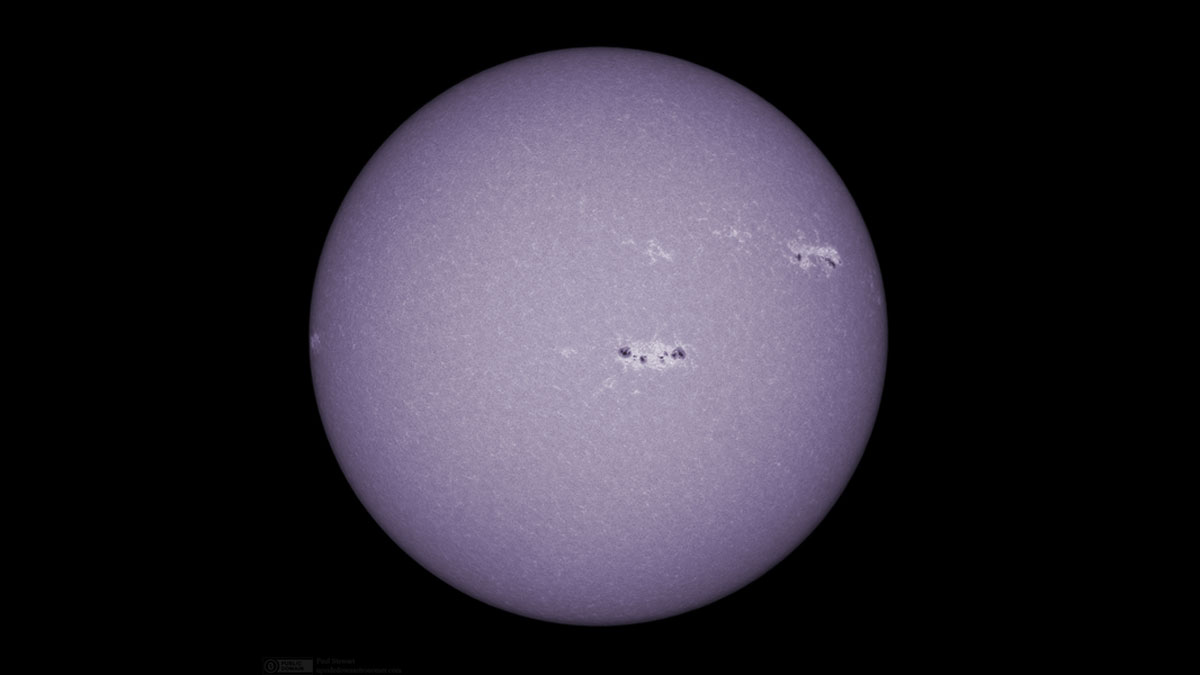
A white-light filter removes over 99.9% of the depth of incoming daylight, nevertheless it doesn’t filter by wavelength. With a white-light filter, you’ll obtain daylight from the solar’s floor. If in case you have a bigger telescope aperture otherwise you plan to level on the solar for a very long time, an ultraviolet and infrared (UV/IR) filter can also be beneficial. This won’t have an effect on your picture, however it is going to take away extra gentle to stop it from heating up your telescope system.
Not like white-light filters, which picture the photosphere, H-alpha and Ca Okay filters picture the next layer of the solar, the chromosphere. These filters work by filtering gentle by wavelength, as a substitute of simply depth, to permit in gentle from a slim a part of the photo voltaic spectrum.
H-alpha is gentle emitted by hydrogen plasma at a selected vitality stage that’s dominant within the chromosphere. This gentle is at a wavelength of 656.28 nanometers, which sits within the purple a part of the seen spectrum. While you use an H-alpha filter, the solar due to this fact seems purple. H-alpha filters may be broadband (about 1 Å) or narrowband (0.5 Å). These will alter the view of the chromosphere barely. Some filters are additionally tunable, which lets you alter the wavelength vary of the filter. Ca Okay filters filter a wavelength of sunshine emitted by calcium plasma at 393.4 nm, which seems blue to the human eye.
While you’re utilizing an exterior filter in your telescope, don’t take away the eyepiece from the viewfinder scope. Whether or not you are utilizing a devoted photo voltaic telescope or an exterior filter on a nighttime telescope, completely different filters will present completely different options on the solar. The pictures under present the solar photographed by means of the H-alpha and Ca Okay filters mentioned above. White-light photos are proven earlier on this article.
Options on the solar
Now that you’ve got your full setup, let’s check out the buildings you possibly can hope to see on the solar.
Sunspots
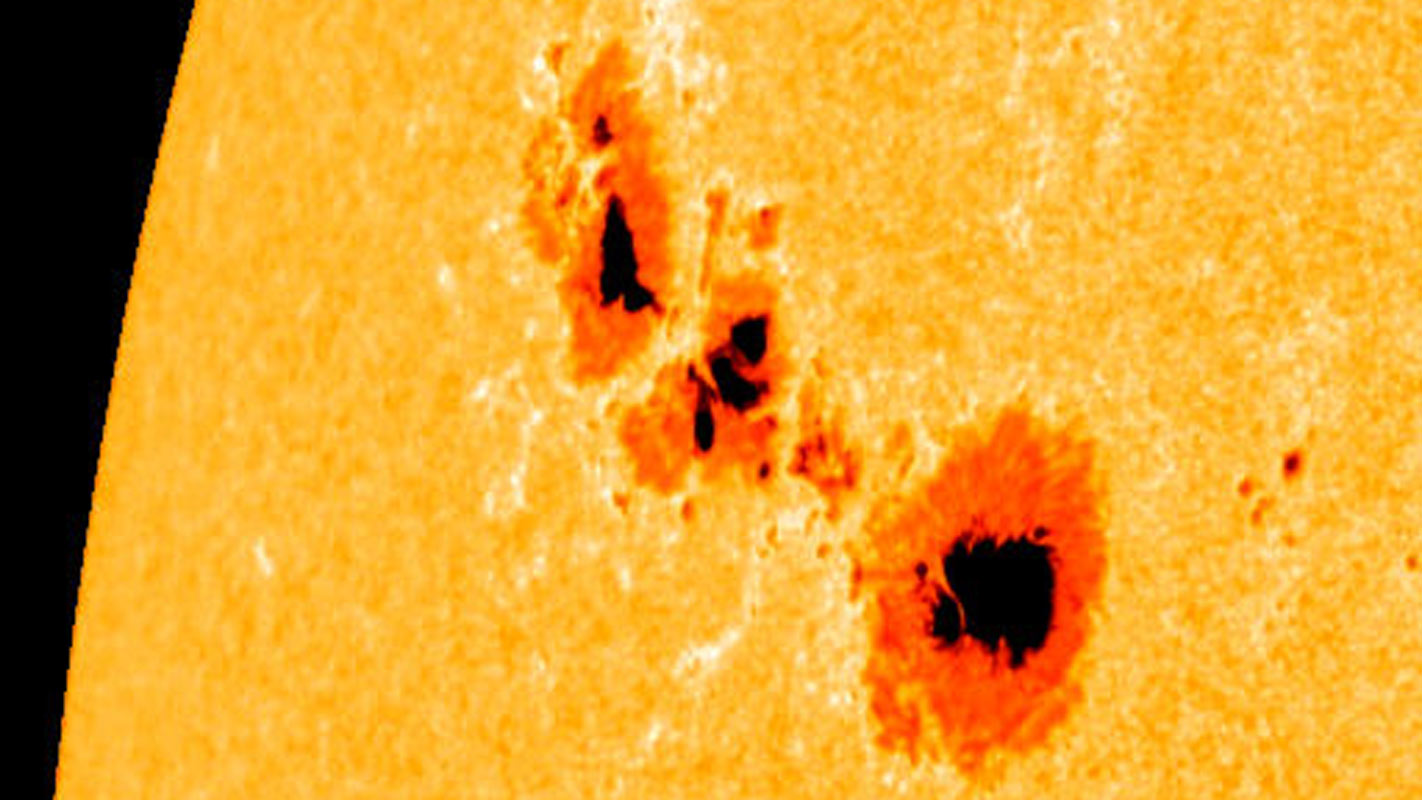
The simplest function on the solar to {photograph} are sunspots. Sunspots are cooler components of the photosphere created by robust areas of concentrated magnetic discipline. The extraordinary magnetic discipline above sunspots is what creates solar flares and coronal mass ejections.
A sunspot appears to be like like a darkish construction with a darker internal part (the umbra) and barely lighter (but nonetheless darker than the encircling photosphere) penumbra round it. Sunspots can exist for weeks or months, however they will change considerably over just a few hours as new magnetic fields emerge, or cancel out, throughout the area. Sunspots are seen within the photosphere by means of white-light filters and photo voltaic telescopes. They’re nonetheless seen in chromospheric filters (H-alpha and Ca Okay), however the distinction isn’t as stark.
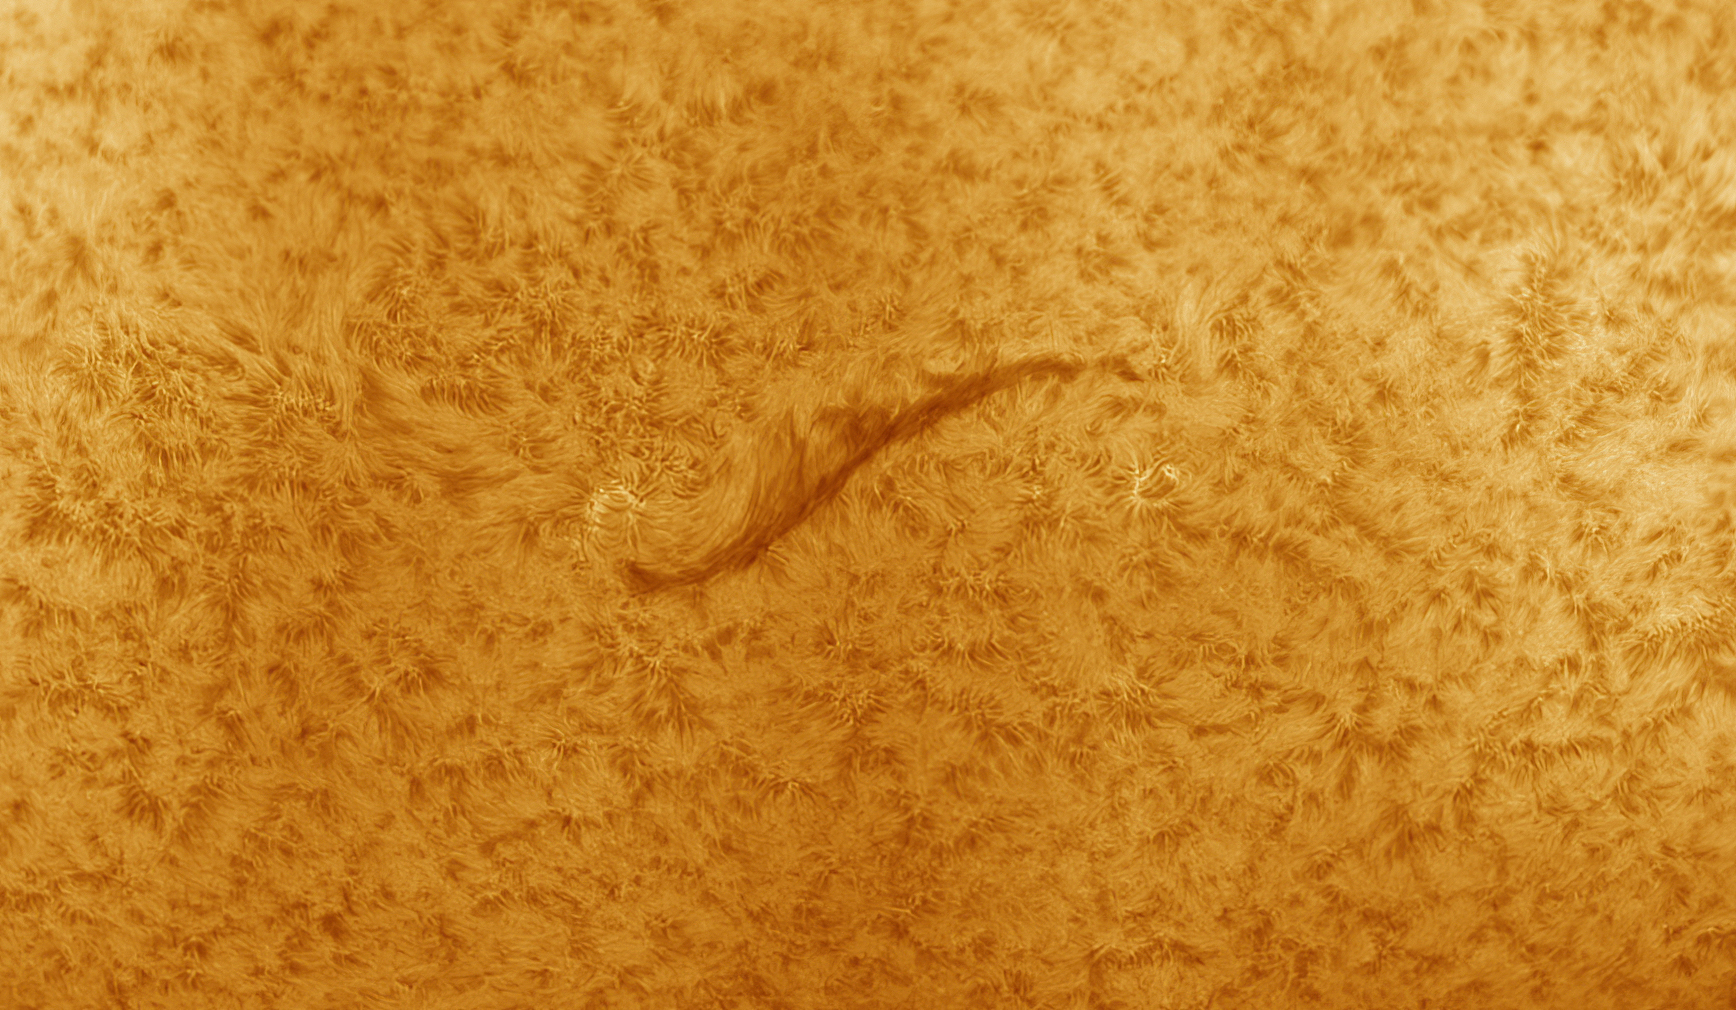
Filaments
At greater altitudes, a distinct kind of magnetic construction is seen. Filaments are twisted magnetic buildings stuffed with chromospheric materials. They’re rooted within the decrease photo voltaic environment, however they stretch into greater altitudes within the corona. As a result of they’re composed of fabric from the chromosphere, filaments will not be seen with normal white-light filters. As an alternative, they require both H-alpha or Ca II filters to be seen. At these wavelengths, filaments seem darkish in opposition to the intense photo voltaic disk.
Prominences
Whereas filaments are seen in opposition to the solar’s floor, prominences are the identical construction however seen over the sting of the solar. In opposition to the background of house, prominences seem vibrant. They are often photographed with the identical filters as filaments, and so they will also be seen with the bare eye through the totality part of a complete photo voltaic eclipse. A tunable slim H-Alpha filter will actually make prominences and filaments pop in opposition to their background. It’s also possible to mess around with the publicity time to vary the distinction of the prominences in opposition to the darkish background.
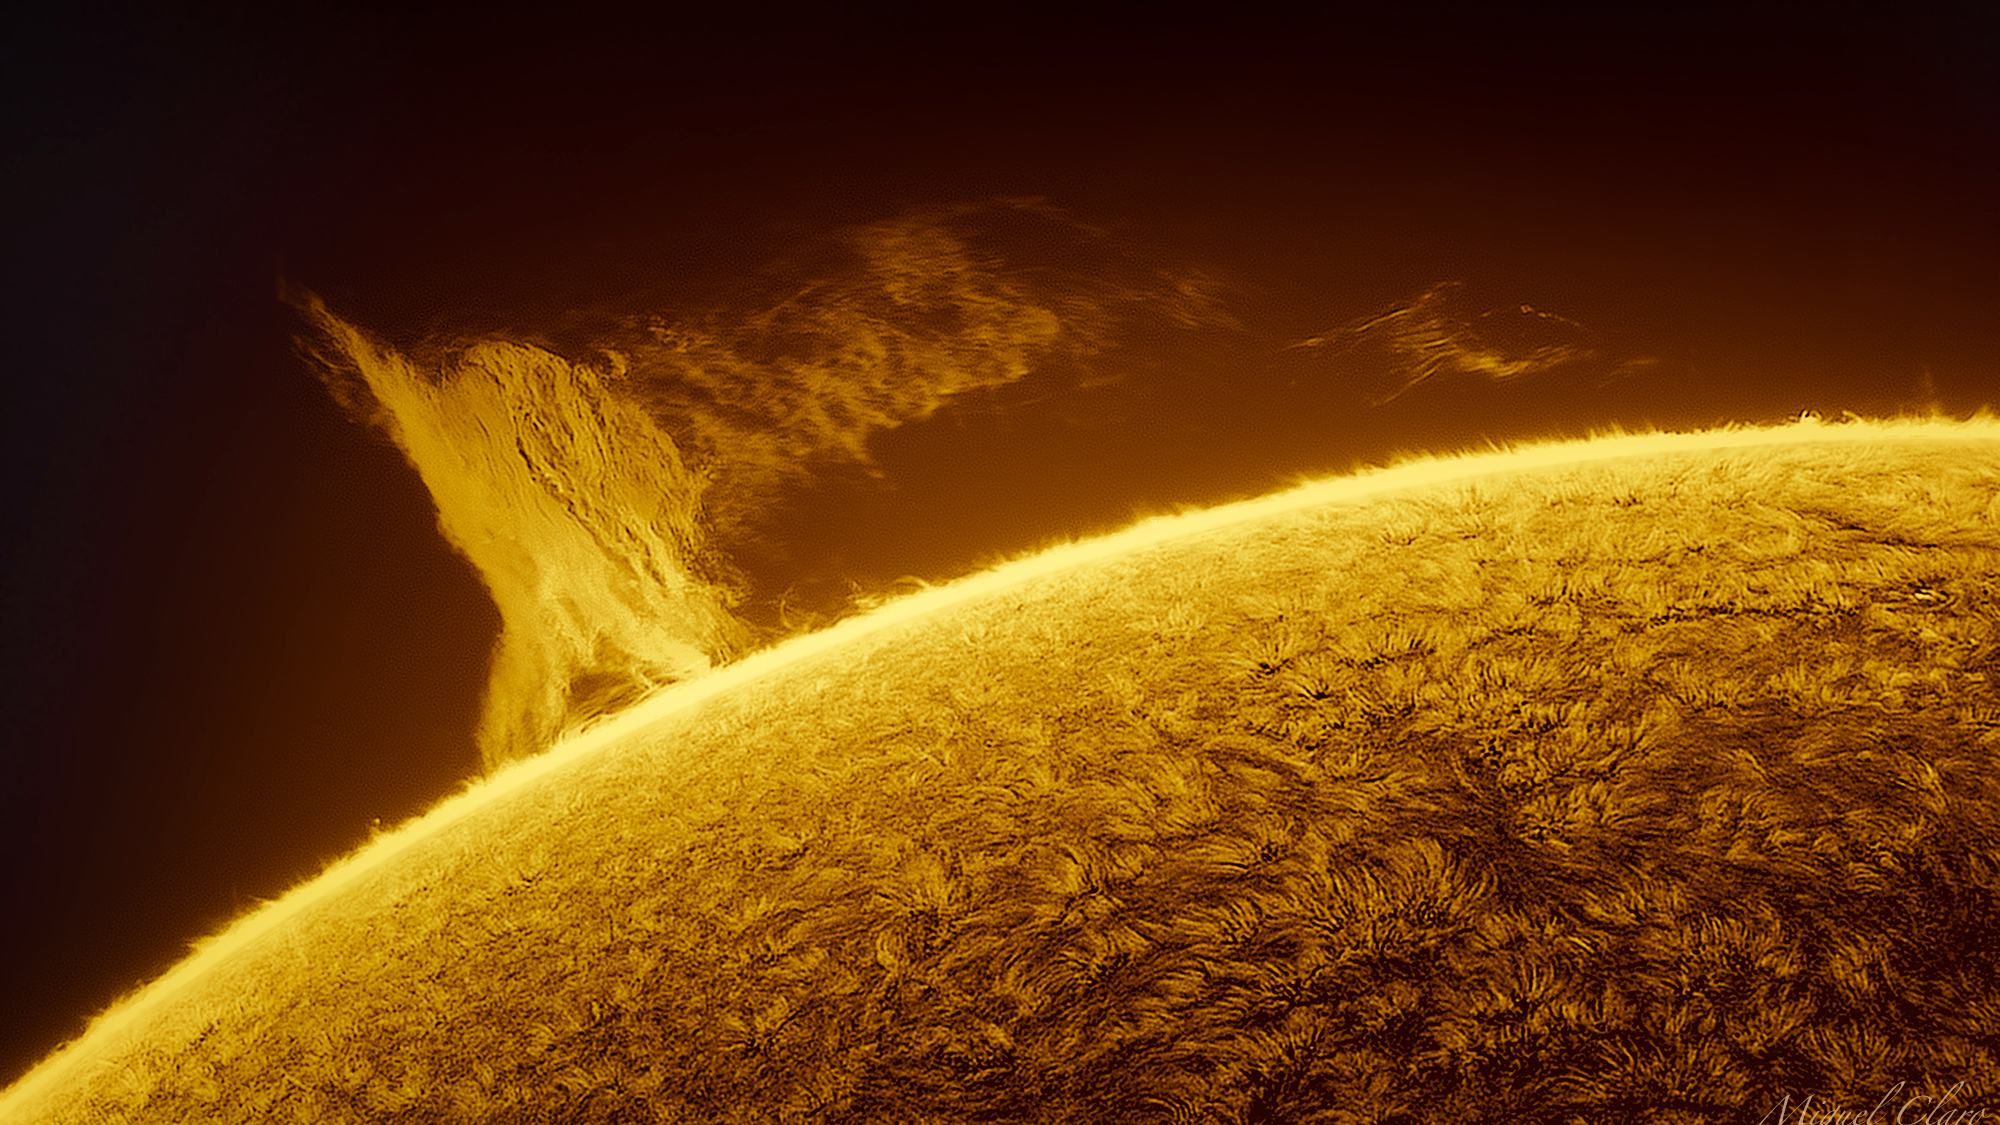
Photo voltaic eclipses
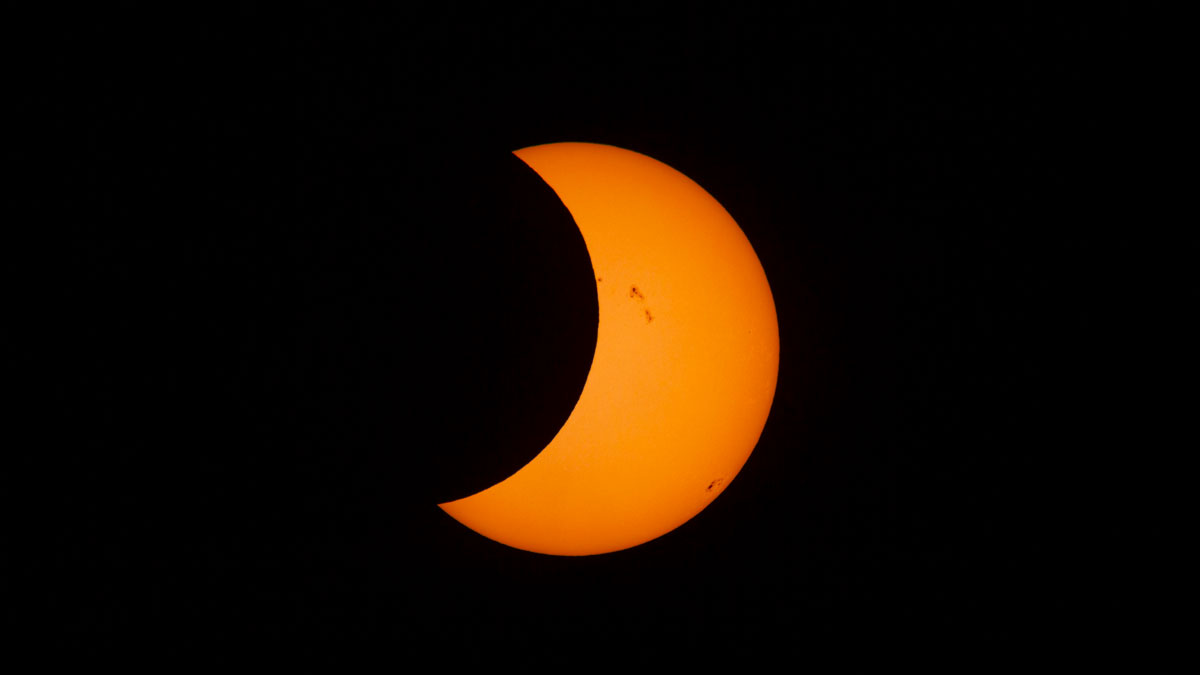
Though the recommendation outlined on this article can be utilized to {photograph} the solar anytime, additionally it is legitimate through the partial phases of a photo voltaic eclipse, when the solar is partially blocked by the moon. The moon’s edge supplies a brand new function to {photograph}, with the intricate irregularities of craters alongside the moon’s silhouette seen. For additional recommendation on photographing the partial or whole phases of a photo voltaic eclipse, take a look at our information on how to photograph a solar eclipse.
If you wish to learn extra concerning the science of observing the solar and the historical past of our relationship with it, take a look at my e book “The Sun: Beginner’s guide to our local star (Collins, 2023).